Below are some helpful questions and answers about Total Gym equipment. Please contact us at any time via email at totalaccess@totalgym.com, or by calling 1-800-541-4900 ext. 5 for further explanation or if you have additional questions or concerns. When calling for information, please have the Serial Number of your equipment.
After the initial all market FAQs on Ordering and Payments, FAQ's are organized by Model Name.
Commercial Fitness (ELEVATE): Encompass | Core ADJ | Row ADJ | Jump | Press | Pull Up
Physical Therapy (Recovery Series): RS Encompass PowerTower | RS Encompass | LEX | Row ADJ
Home Fitness (Heritage Collection): Total Gym GTS | Total Gym Row Trainer | Total Gym FIT | Total Gym XLS
You can place your order online or call us directly at 1-800-541-4900 ext. 5 to place your order and pay over the phone.
As equipment purchased from Total Gym Commercial is not offered via payment plan, you have likely purchased from Total Gym Direct. Please contact them directly via their online contact form or call them at 1-800-501-4621.
We accept all credit or debit cards: Visa, MasterCard, Discover or American Express.
Total Gym treats warranty claims as a priority. To submit a warranty claim, please find out the model name, SKU, and serial # of your Total Gym unit. Contact Total Gym customer service department at 1-800-541-4900 ext. 5 or email totalaccess@totalgym.com. A Total Access representative will issue you an RMA number along with instructions for proper submission of the warranty claim.
Please note: Total Gym does not accept warranty or returned merchandise without an accompanying RMA number.
Or if you happen to have an older unit, we would love to chat about upgrade discounts.
Send us the model and serial # as well as the year of purchase and we can tell you. Email totalaccess@totalgym.com or call 1-800-541-4900 ext. 5. If you happen to have an older unit, we would love to chat about upgrade discounts!
Model information sticker is on the back of the tower in the lower left.
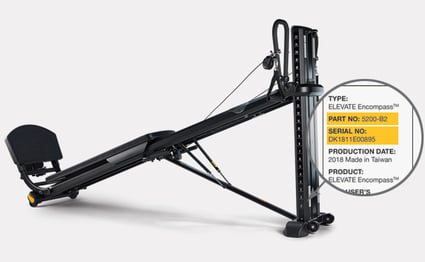
27 square feet (this is just the equipment measurement)
Stand next to the top rails.
Grasp the rail between the tower and the folding foot holder and lift to the desired level as shown on the incline scale.
Push the rail down to ensure they engage into the tower.
Note: Squeeze the release handle as you raise the rails to avoid the ratcheting sound.
Stand next to the top rails.
Grasp the rail between the tower and the folding foot holder and lift it slightly.
With the other hand, squeeze the release handle on top of the tower to unlock the tower cross arm.
Continue squeezing the handle and lower the rails to the desired level shown on the incline scale on the side of the tower, then let go of the release handle.
Push the rail down to ensure they engage into the tower.
You may download the ELEVATE Encompass resistance charts here. Resistance charts are also found in your Owner's Manual, which is available under the download tab along with several other resources on the Encompass product page.
In the US, the ELEVATE Encompass includes:
Frame – 5 years
Parts & Upholstery – 1 year
Foam & Rubber – 90 days
Warranties outside the US may vary. Contact your local authorized distributor for details.
If you are having any issues with your unit, please give us a call at 1-800-541-4900 ext. 5 or email totalaccess@totalgym.com. Or if you happen to have an older unit, we would love to chat about upgrade discounts.
Using an allen key, loosen the screws of the pulleys, this will remove the plastic covers and reveal the pulley. Remove the B-clip and pull the clevis pin and slide out the pulley wheel and off from the cable. Replace the bad pulley with new pulley, reattach the pulley by reversing the steps.
Using an allen key, loosen the screws of the pulleys, this will remove the plastic covers. Replace with new covers and tighten the screws.
Loosen the quick link attaching the cable to the handle, detach the handle from the pulley and replace with new handles and tighten the quick links.
Start by folding your machine into a folded position, always making sure to lock it. Take hold of the middle part of the glideboard and carefully lift and slide it off the rails. Using and allen key and wrench, loosen the nut and bolt on the rollers and remove the old ones from the unit, replacing them with your new rollers. Re-install your glideboard.
To start with, we recommend to clean the rails at least once a week. If this doesn’t help, the rollers maybe worn and needs to be replaced. Contact your Total Access agent at totalaccess@totalgym.com to assess further.
Using an allen key, loosen and remove the screws from the end cap of the rails, and slide the glideboard off the rail. Set the glideboard on a table and unscrew the old pad from the frame. Install the new pad by aligning the holes to the frame and screwing it in.
50 lbs total (up to 25lbs on each side)
Model information sticker is on the incline strut.
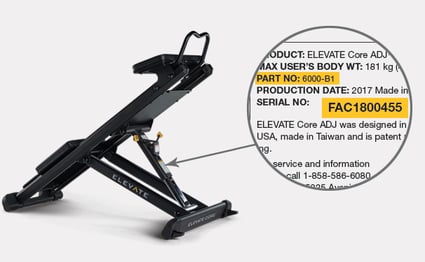
Using an allen key, loosen and remove the screws from the end cap of the rails, and slide the glideboard off the rail. Next, loosen the nut and bolt on the rollers and remove the old ones from the unit, replacing them with your new rollers. Re-install your glideboard.
18 square feet (this is just the equipment measurement)
400lbs
Model information sticker is on the incline strut.
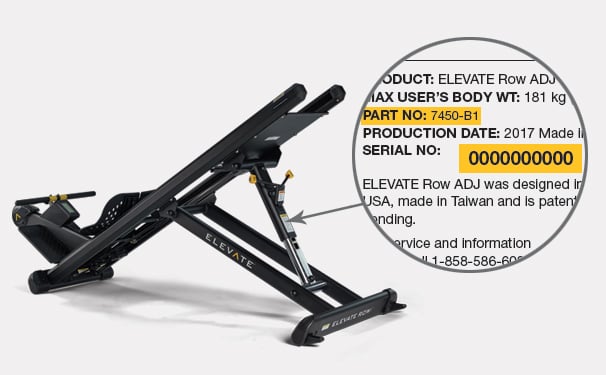
24 square feet (this is just the equipment measurement)
Model information sticker is on the incline strut.
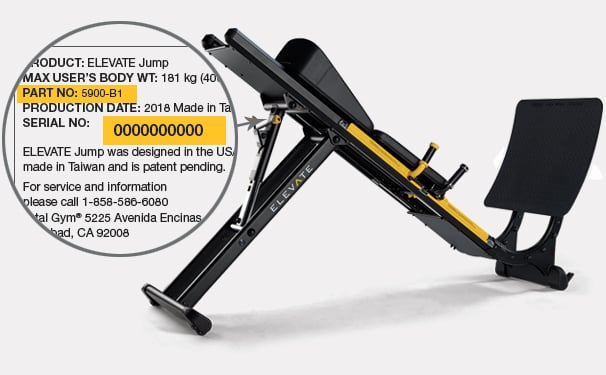
22 square feet (this is just the equipment measurement)
The ELEVATE Jump has anchor feet with bolt holes should be bolted to the floor to keep the unit stationary during use.
To ensure you have positioned the ELEVATE Jump with enough clearance before bolting to the floor, first lower the Incline Strut to the lowest level. From the Floor Anchor Bolt Holes measure at least 104 inches [3.56 m] from the Bolt Holes behind the machine to any walkway, or at least 140 inches [3.56 m] away from any wall or obstruction.
Bolt down machine at Front Base through the Bolt Holes provided on the Anchor Feet. NOTE: Installation must be carried out by a Professional Installer.
This will warrant enough room for full range of motion of the Glideboard at the rear of the unit.
NOTE: There should also be at least 3 feet (1 meter) distance between the Rear Base and a wall or walkway. Consult your local government guidelines.
Model information sticker is on the incline strut.
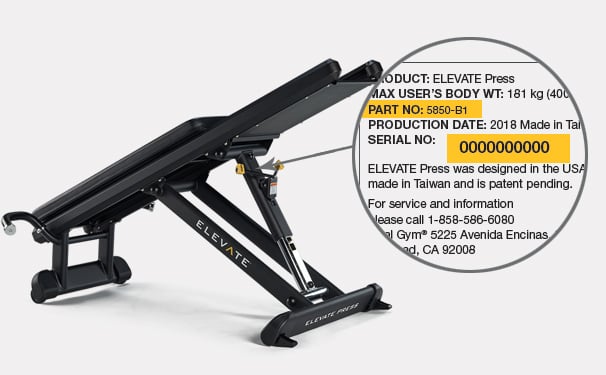
18 square feet (this is just the equipment measurement)
Model information sticker is on the incline strut.
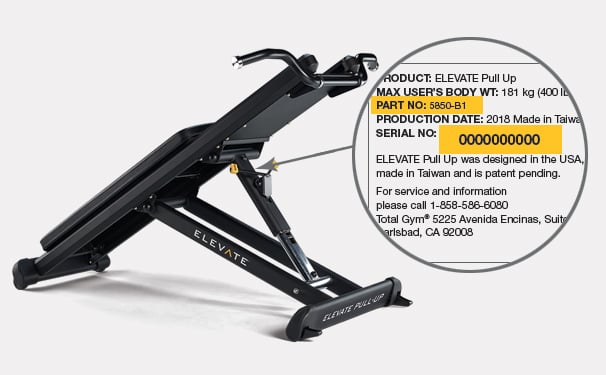
22 square feet (this is just the equipment measurement)
200 square feet
Max weight on each unit is 400lbs.
230 square feet
The Encompass can hold a total of 500lbs, while the rest are 400lbs max weight.
Model information sticker is on the back of the tower in the lower left.
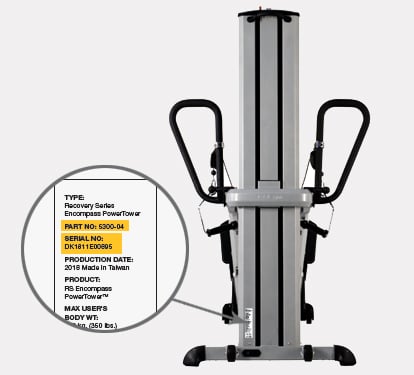
27 square feet
650lbs max load capacity
Check if there’s power to your outlet. If there’s power, check that the switch is flicked upwards, check the LED on top of the tower if it’s lit, if not lit this means the fuse is blown. To check and replace the fuse, unplug the cord from the wall outlet and pull the cord from the back of the tower. Locate the fuse box, the fuse box is located just to the side of the power plug and has an embossed photo of a fuse, Pry this box off using the flat end of the screw driver and this will reveal the fuse. There is an extra fuse inside this box, remove the bad fuse and replace with the extra fuse, reattach the fuse box and plug in the cord and wall outlet and check if the power is on.
110-220 volts
300lbs (up to 150lbs on each side)
Model information sticker is on the back of the tower in the lower left.
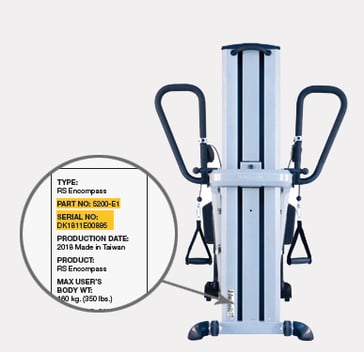
27 square feet
500lbs max load capacity
Note: Squeeze the release handle as you raise the rails to avoid the ratcheting sound.
Stand next to the top rails.
Grasp the rail between the tower and the folding foot holder and lift it slightly.
With the other hand, squeeze the release handle on top of the tower to unlock the tower cross arm.
Continue squeezing the handle and lower the rails to the desired level shown on the incline scale on the side of the tower, then let go of the release handle.
Push the rail down to ensure they engage into the tower.
You may download the RS Encompass resistance chart here. Resistance charts are also found in your Owner's Manual, which is available under the download tab along with several other resources on the product page.
In the US, the RS Encompass includes:
Warranties outside the US may vary. Contact your local authorized distributor for details.
If you are having any issues with your unit, please give us a call at 1-800-541-4900. Or if you happen to have an older unit, we would love to chat about upgrade discounts.
50 lbs total (up to 25lbs on each side)
Model information sticker is on the incline strut.
Using an allen key, loosen and remove the screws from the end cap of the rails, and slide the glideboard off the rail. Next, loosen the nut and bolt on the rollers and remove the old ones from the unit, replacing them with your new rollers. Re-install your glideboard.
22 square feet
Raise the rail up to the highest level. Unclip the bungee from under the top of the rail, and pull the bad bungee from the front side through the holes of the frame. Replace the new bungee and attach the clip.
The RS LEX has anchor feet with bolt holes should be bolted to the floor to keep the unit stationary during use.
To ensure you have positioned the RS LEX with enough clearance before bolting to the floor, first lower the Incline Strut to the lowest level. From the Floor Anchor Bolt Holes measure at least 104 inches [3.56 m] from the Bolt Holes behind the machine to any walkway, or at least 140 inches [3.56 m] away from any wall or obstruction.
Bolt down machine at Front Base through the Bolt Holes provided on the Anchor Feet. NOTE: Installation must be carried out by a Professional Installer.
This will warrant enough room for full range of motion of the Glideboard at the rear of the unit.
NOTE: There should also be at least 3 feet (1 meter) distance between the Rear Base and a wall or walkway. Consult your local government guidelines.
400lbs
Model information sticker is on the incline strut. NOTE: While the ELEVATE Row ADJ is shown below, but the information appears in the same location on the RS Row ADJ.

Using an allen key, loosen and remove the screws from the end cap of the rails, and slide the glideboard off the rail. Next, loosen the nut and bolt on the rollers and remove the old ones from the unit, replacing them with your new rollers. Re-install your glideboard.
12 square feet
Raise the rails to the highest level. Unhook the old bungee (underneath the unit) and loosen the screw from the pulley, being careful not to fully remove the screw. Slide the old bungee out, replacing it with the new one. After putting the new bungee in, tighten the screw and reattach the loop ends of the bungee to the hooks.
Using a screw driver, loosen the 4 screws to allow you to carefully pull the computer out of the unit. This will reveal the back side of the panel, allowing you to replace the AA batteries.
400lbs
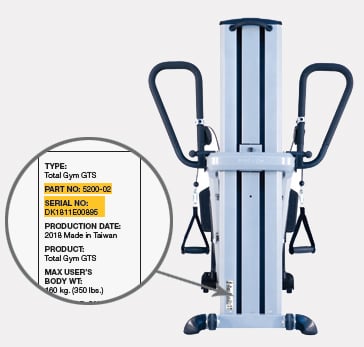
Model information sticker is on the back of the tower in the lower left on the Total Gym GTS.
27 square feet
500lb max load capacity
Warranties outside the US may vary. Contact your local authorized distributor for details.
If you are having any issues with your unit, please give us a call at 1-800-541-4900. Or if you happen to have an older unit, we would love to chat about upgrade discounts.
Using an allen key, loosen the screws of the pulleys, this will remove the plastic covers and reveal the pulley. Remove the B-clip and pull the clevis pin and slide out the pulley wheel and off from the cable. Replace the bad pulley with new pulley, reattach the pulley by reversing the steps.
Loosen the quick link attaching the cable to the handle, detach the handle from the pulley and replace with new handles and tighten the quick links.
50 lbs total (up to 25lbs on each side)
12 square feet
400lbs
12 square feet
450lbs
12 square feet
400lbs